Yes, quilters are crazy. When we are a little stressed we go to pieces.
I am sure that you have all heard this by now, but it is still so funny AND so true. To help you understand how "crazy" we quilter are, I started looking for a few other "crazy" quilt blogs and I have found a few.
Crazy About Quilts
Crazy Mom Quilts
(my favorite all time blog)
Crazy Old Ladies
I am sure that there are a LOT more crazy quilter out there. I just can't find them in a quick search. Also, you can't mention how crazy we are without mentioning crazy quilts.
Crazy Quilting International looks interesting.
Crazy Sticker loves crazy quilts
We may all be a little crazy and of course we come with strings attached.
If you are a crazy quilter (like me) embrace the crazy. It is so much more fun.
Friday, December 21, 2012
Tuesday, December 18, 2012
AU Scrap Quilt
I finished my Auburn quilt top.
I used many scraps from the Syracuse quilt.
If you live in Alabama you know that there are only two teams that matter. They are Auburn University and the University of Alabama.
FYI-I am a Nebraska fan.
This quilt is a gift for someone. I am sure that she does not read my blog, so we are safe.
I have been planning to make an AU quilt for said friend for about a year and decided that instead of purchasing all new fabric I would use what I had and just make it already.
I think it turned out very nice using the scraps. I did buy the darker AU fabric for this quilt because there was just not enough AU in the quilt and it needed some thing darker or blue or something. I think it really made it better.

The wind was yet again trying to sabotage me.

I thought I would try a different location for pictures and stopped at this house. The front gate was the perfect size for my quilt. That house is so pretty I may have to take more pictures here. Maybe when I finish this quilt I will take it back to this house for a finished picture.
The wind was less a problem here, yay!
I am not far from finishing this quilt. I started quilting it and did not like the quilting so I put it to the side. Now I like the quilting, but the tension did not like me well. I may be pulling out quilting anyways :(.
Saturday, November 24, 2012
Half-square triangle quilt
As promised, although a couple days late, here is the half-square triangle quilt.
This quilt is for my niece as a graduation present. She doesn't get on my blog, so I am sure that I am safe. I hope to finish it soon and get it to her, since she graduated in May.

I wanted to get a good picture of it. So I hung it in the tree. A cold front came through last night and it was windy. So, I had trouble getting a picture as you can probably see. I put it in one tree and it twisted and turned so, I moved it to another tree and turned it. It still twisted and turned a little so, I just got what I got. I hope to get a better picture when it is finished.
It is a square quilt, and I have not decided which side is the top. Which one do you like?
Also, I have not decided on a name yet. Any ideas?
Tuesday, November 20, 2012
half square triangles
I am making huge half square triangles. Well I started making them July 8. I kinda put everything on a back burner for awhile. I have been dabbling in sewing, but I am working my way back into sewing quilts. That sounds really strange.
Anyways, I am not dead, ha ha. I plan to finish the half square triangle quilt tomorrow, and soon I will show you what I have been up to. Quilty wise, the rest is boring.
Anyways, I am not dead, ha ha. I plan to finish the half square triangle quilt tomorrow, and soon I will show you what I have been up to. Quilty wise, the rest is boring.
Wednesday, August 29, 2012
Mini Skirt Tutu
My sister is going to Dragon*Con and asked me to make a skirt for her. She showed me a drawing of what she wanted. I thought it looked like a mini skirt with tulle. She thought I was making her a tutu. Instead she got the mini-skirt tutu.

Here she is in her costume. A preview to the final costume.The skirt was well received.
Because she thought it was a tutu, she has a pair of shorts on under that, thankfully. She is the adventurous one in our family or maybe I am just getting old.

Here is the skirt freshly made. I was very happy how it turned out and with the material for the skirt. I got it at Walmart and may go back and get some more of it. I was so soft and stretched just right. I know because I tried it on. Maybe not so old after all.
By the way, this is post 100. Wow!
Thursday, August 16, 2012
T-shirt Memory Quilt
I finished the T-shirt quilt! I had so much fun piecing and machine quilting it.

On the border pieces I tried to change the quilting from each block and to do something special (I did not always succeed; some are the same quilting pattern). These blocks did not have a print on them, so the quilting was a little more noticeable and there was more room to be creative. Let the creative juice/ fun flow!
Does anyone else see the cat in the picture? He was such a ham!
Then this guy had to come over to see what all the excitement was about. See how the cat is all like "Nothing to see here!"

Maybe you can see the back. I just love how the thread pops! So much fun!

With all of the Alabama T-shirts, I felt that an Alabama themed binding was in order. It looks really good on this quilt!

I want to thank my mother-in-law for being my wonderful quilt model. She did a great job. Even when I was like "One more. One more. Just one more...." I think we will have to do this again. She is that good.
This quilt measured 79"x64" not a bad size at all.
Other posts are here, here, here, here, and here. Wow, I did not realize how many times I have blogged about this quilt!
Thursday, August 9, 2012
Vintage Sheets
I won this stack of fat quarter vintage bedsheets.

I rarely win anything, but I won this. I was so super excited to win, and so happy when I got the package in the mail.


I think I will make this quilt with the bundle. Don't you think it will look nice?
I got this in mid-February, but I am so slow in doing anything. This year has been one of the hardest to do much of anything.

I rarely win anything, but I won this. I was so super excited to win, and so happy when I got the package in the mail.

Look, I got a smily face!

I pulled it out of the package, and it just looks so good.
It even smells good. I wish you could send smells through the internet.

I think I will make this quilt with the bundle. Don't you think it will look nice?
I got this in mid-February, but I am so slow in doing anything. This year has been one of the hardest to do much of anything.
Monday, August 6, 2012
T-shirt quilt update
The new tactic for quilting the T-shirt quilt is going MUCH better!
Just look as some of the quilting. This is free motion quilting. I just embraced and went with it. There is some straight line quilting, mostly to outline the blocks.
I was not enjoying free motion quilting when I started. I was pushing the pedal to the floor and trying to keep up with my hands.Then I read somewhere that there is no need to hit the pedal at full speed. We are not in a race. Sewing machines, much like a cars, have different speeds that we control through the pedal.
I had not thought about that, and it changed how I was sewing.
"You are here" in Tuscaloosa, Alabama. Echo quilting and a little water like quilting.


I don't know how this happened. I just started sewing and my hands just moved to create it. I think it is very cute.


back of the scallops/ shells


Just look as some of the quilting. This is free motion quilting. I just embraced and went with it. There is some straight line quilting, mostly to outline the blocks.
I was not enjoying free motion quilting when I started. I was pushing the pedal to the floor and trying to keep up with my hands.Then I read somewhere that there is no need to hit the pedal at full speed. We are not in a race. Sewing machines, much like a cars, have different speeds that we control through the pedal.
I had not thought about that, and it changed how I was sewing.
"You are here" in Tuscaloosa, Alabama. Echo quilting and a little water like quilting.

Reminds me of water flowing.

I don't know how this happened. I just started sewing and my hands just moved to create it. I think it is very cute.

My husband said this looks like electric guitars. Which is what I thought. It is the same as the water above, just positioned differently.

Scallops/ shells

back of the scallops/ shells

This is what the back looks like. I would not have chosen white for the back, but I am very fond of it. It does show my mistakes, but it also shows the designs. Very dramatic.

This quilt is not far from being finished. Just a little more quilting, burying the rest of the threads, and the binding. I hope to have this finished in the next two weeks. I better get busy.
Thursday, July 12, 2012
Quilting Some
I have started quilting on the most recent T-shirt quilt.

I don't know what I am doing wrong, but this quilt is being difficult. It is not difficult to quilt it; it is difficult to keep the backing tight. I am picking out two of the three straight stiching lines that I quilted and will quilt it a different way. Maybe this tactic will work better.
Monday, July 9, 2012
Canning
I have a garden that is bursting with tomatoes.
So, I have spent some time this summer canning them.
Canning is not something I remember my mother doing. I am sure that my grandparents canned, but since we never lived near, within driving distance, or even in the same state as them, I was unable to be a part of their canning ventures.
One thing I learned from my mother was that being prepared to feed your family is important. She did this by compiling a large pantry of food, almost to the point of hoarding.
With that in mind, I put away what I can from my garden. I use to only freeze my vegetables, but last summer I learned how to can pickles and tomatoes. My husband LOVES the pickle,s and I really enjoyed not having to purchase canned tomatoes. Opening a jar of tomatoes that I canned was bliss this past winter, especially with the limited budget we were on during my student internship.
So, while I have not been sewing or making things, this is what I have been doing: picking, rinsing, and canning.

Boiling water to loosen the skin

Cool down

peeled and put in jars
thinking of winter already with that towel

water bath

my canning products that have not already been eaten or given away
salsa, pickles, tomatoes, and jalapenos
Are you canning anything this summer?
Saturday, July 7, 2012
Loss
The sadness that I alluded to in this post has manifested into loss.
On June 7 we lost my father-in-law.
He began battling pancreatic cancer in 2009 and seemed to be doing very well after surgery and chemotherapy.
Last summer, he developed liver cancer.
On March 7 his doctor told him that he had three to six months without chemotherapy and six to nine months with chemotherapy.
With this knowledge he decided to stop chemotherapy.
It was very hard for the family to watch him in pain, slowly slipping away.
It seems surreal knowing that he is gone.
There is so much that he will miss, and we will miss he so much.
Even with all of this, we know that he will never feel pain again, and that gives us comfort.
Thursday, July 5, 2012
New Iron
Five years ago I broke my iron. So that I could finish the baby quilt I was working on for the arrival my nephew, I "borrowed" an iron from my mother-in-law (this was her second grand baby). She told me at that time to not worry about it because she had bought a new one anyways. (Thank you Lisa for loaning me the iron.)
Well, it never made its way back. I have used it well making many quilts in these past five years.

I do not know its age exactly, but I think that it is over ten years old. It has my sister-in-law's (the one who had the baby) name on it from when she took it to Atlanta when she was a senior in high school. That was about ten years ago.
It is not fancy. It does not have a timer to shut off, a sprayer on the front, or anything else fancy like that, but it has worked great. Just right for pressing quilt pieces.
This past winter my husband and I were watching "Quilty" on PBS. Mary Fons was using an iron that would lift up on its own. Right away my husband said that I should get an iron like that.
I am one of those people who doesn't replace something that isn't broken. My "borrowed" iron worked just fine, thank you. Still we looked a little for irons, but I was just not going to get an iron while I still had a working one.
Well, about three weeks ago my "borrowed" iron began to leak. It was leaking brownish water on my fabric. Let me tell you it was a sad day.
I went on-line and found the iron and in just a little while it arrived on my porch.
So far I have been enjoying it. It doesn't leak on my fabric, so that is a plus.
Check out Quilty's homepage. I find it helpful and fun.
Well, it never made its way back. I have used it well making many quilts in these past five years.

It is not fancy. It does not have a timer to shut off, a sprayer on the front, or anything else fancy like that, but it has worked great. Just right for pressing quilt pieces.
This past winter my husband and I were watching "Quilty" on PBS. Mary Fons was using an iron that would lift up on its own. Right away my husband said that I should get an iron like that.
I am one of those people who doesn't replace something that isn't broken. My "borrowed" iron worked just fine, thank you. Still we looked a little for irons, but I was just not going to get an iron while I still had a working one.
Well, about three weeks ago my "borrowed" iron began to leak. It was leaking brownish water on my fabric. Let me tell you it was a sad day.
I went on-line and found the iron and in just a little while it arrived on my porch.
So far I have been enjoying it. It doesn't leak on my fabric, so that is a plus.
Check out Quilty's homepage. I find it helpful and fun.
Saturday, June 30, 2012
Computer Results
So, I what I thought was Ms. Computer having an attitude turned out to be old age. She is about six-years-old. She was in need of a new fan and a new modem for starters. I was told that it would cost about as much to fix her as to replace her.
I am not giving up on her though. I am going to take her to a family member who, hopefully, can help her a little.
As for now, I have already made arrangements to replace her.
So, if we can get her to work a little longer then she will be appreciated, so that we will not have to divide time with her anymore (between my husband and me).
It seems that electronics just do not last!
Thursday, June 28, 2012
Monday, June 25, 2012
Computer Issues
So, my computer is putting up a fight. It freezes up, mostly.
It seems it only wants to work when it wants to work.Which SUCKS!
I will keep you up-to-date as best I can about my crazy creations.
Hopefully miss computer will be on the mend soon.
It seems it only wants to work when it wants to work.Which SUCKS!
I will keep you up-to-date as best I can about my crazy creations.
Hopefully miss computer will be on the mend soon.
Saturday, June 16, 2012
New T-shirt flimsy
My latest T-shirt quilt top is finished.

I used as much of the shirts as I could by using the T-shirt backs and what was left from the T-shirt front to make the border.
 |
| Bonus-you get a peek of my garden. |
I really really wanted to have this quilt FINISHED by Father's Day, but, alas, it was not to be. I did, however, finish the top and will start quilting it by Father's Day.
 |
| You know you love my retro kitchen floor |
I really like the borders. What do you think?
Thursday, June 14, 2012
Replacing a Lost Quilt: Mission Accomplished
Mission accomplished!
 |
| in the shade |
I put all of the blocks together and took this picture before putting the borders on.
Don't you love the speaker and part of my computer in the picture?
 |
| almost a finished top |
After I had the blocks sewn together long way (top to bottom) with the sashes between the top and/or bottom of each block, I measure how long it was so that I could get a measurement for the remaining sashes. I was hoping that it would not measure over 44" so that I could just cut from selvage to selvage.
Unfortunately it was bigger. I do not like to sew sashes together if I can help it. I just prefer the look of one long slender cut. So more thinking cap...
Fortunately I was given approximately six yards of the green fabric for this project. If I was careful I would have enough to cut the sashes, borders, and binding and still have enough for the backing.
I did the math and thankfully it was close enough (math is not my strong point).
With the sashes being two and half inches finished I started cutting. Instead of adding half and inch for seams (so three inches), I cut it two and a half inches! So, I just put it aside for the binding. I still had more than enough for the borders, the sashes, and the binding left, but still. Talk about being nervous!
I finished the top and started quilting.
I marked lines in between the blocks and started quilting.
It has minimal quilting. I wanted to quilt it more, but I could not really quilt in the blocks and it was not easy to see on the fabric.
This quilt turned out to be a LOT bigger than I expected. Measuring: 53x55"
Doesn't it look so different in the setting sunlight?
I finished the top and started quilting.
I marked lines in between the blocks and started quilting.
 |
| setting sunlight |
This quilt turned out to be a LOT bigger than I expected. Measuring: 53x55"
Doesn't it look so different in the setting sunlight?
 |
| backing |
I am happy to report that the recipient loved it.
Can you tell which three has muslin behind them?
Can you tell which three has muslin behind them?
Wednesday, June 13, 2012
Replacing a Lost Quilt Details
This quilt was very straight forward.
The blocks were already made and all I had to do was put them together using sashing. To prepare, I was cutting the blocks into a more uniform rectangle. This was working until I found that there were three blocks that did not want to lie flat.


I basted as close to the edge and keep the sewing as straight as I could and stitched the folds in so that they would remain permanent.

Then I cut the block to size.
It worked perfectly! So, I repeated with the other two worrisome blocks.
Continued success!

I cut the rest to size and began to sew on the sashing. After sewing a couple this happened.

I sewed the sashing on backwards! I am just glad that it only happened once and in a small piece. I dislike working with the seam ripper, but who does?
The blocks were already made and all I had to do was put them together using sashing. To prepare, I was cutting the blocks into a more uniform rectangle. This was working until I found that there were three blocks that did not want to lie flat.

No matter what I did to cut or iron it, it would not lie straight. I did not know what I would do. I was worried that if I left it the way it cut that it would not sew straight, the sashing that would not lie straight, and the quilt would have this big wave. So, I put on my thinking cap. Thinking.......
What if I basted the block to something to stabilize it? That could work. Then I can cut that down to size and sew the basting stitches inside the seam. Why not? We use muslin for all sorts of stabilization of blocks.
Perfect! I decided right away to use muslin and later (after already using muslin) thought about paper.

I basted as close to the edge and keep the sewing as straight as I could and stitched the folds in so that they would remain permanent.

It worked perfectly! So, I repeated with the other two worrisome blocks.
Continued success!

I cut the rest to size and began to sew on the sashing. After sewing a couple this happened.

I sewed the sashing on backwards! I am just glad that it only happened once and in a small piece. I dislike working with the seam ripper, but who does?
Thursday, June 7, 2012
Replacing a Lost Quilt
I am putting together a quilt top for a friend of a friend. This was the original.
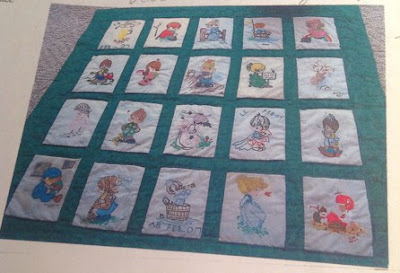
The tradition of this family is that when one of the women of the family has her first child all of the other women make a quilt block to be put into a quilt for that child. These quilts are family treasures.
Unfortunately this quilt was lost in a house fire. Many family members got together to replace the original blocks, and I was asked to do the honor of putting these blocks into quilt top and quilting it. Which is what I have been working on the past two weeks.
More to come...
Wednesday, June 6, 2012
maxi skirt
 axi skirts have been fashionable recently. I knew that I wanted one but I did not want to purchase one when I could make it instead.
 So, I started looking for tutorials and used a couple. These are a few that I found:
This maxi skirt tutorial is fabulous (and is the one I used for the red skirt). Another maxi skirt tutorial that is straight forward. Yet another maxi skirt tutorial that uses regular fabric instead of jersey fabric. There is even a tutorial to turn a dress into a maxi skirt. This looks so cool. I am on the look out for a dress that will work. My favorite (other than the fabulous three tired skirt) is this maxi yoga skirt (this is the tutorial I used to make the grey and blue polka dot skirts).

Here are a couple of things that I learned making these skirts:
Definitely use a ball point needle on jersey fabric. I skipped this at first and my stitches were skipping also.
Do NOT cut the bottom of your fabric and hem it before washing. You will REGRET it. I do!
Jersey does not ravel, so when you have it all finished (except the length) throw it in the washer and dry it. If you are still worried serge or zigzag the edge before washing it. Then cut or sew it to length. With the red skirt I just turned up the edge about a quarter of an inch and sewed the hem. I got lucky with that one. The grey one is the one that I have regrets with. I think I may shorten it a few inches and then hem it again.

Now I just need to finish the other two. Hopefully I can find a tutorial that adds pockets.
Thursday, May 31, 2012
May Small Project Wrap up.
I will go into detail later. For now I want to get this post up before May is over.
I finished three skirts!

I finished three skirts!

I still have two more that I want to make, but they will have to wait until June err tomorrow.
I did not finish the tree skirt. BUT I did work on it, which is more than I have done in months *cough* years. I hope to get it finished in June, and then I will have a big reveal.
Baby sheet? I guess it is going to the June list also.
How did you do?
Monday, May 28, 2012
New Stack of T-shirts Coming Together
This is what I have so far with the new stack for the newest T-shirt quilt.

It will not take much more to have this quilt top finished. I will definitely keep you informed on how this is turning out, but right now it is looking great.

It will not take much more to have this quilt top finished. I will definitely keep you informed on how this is turning out, but right now it is looking great.
Saturday, May 26, 2012
More Baby Blankets
I finished the final three baby blankets for the month of May.

I had fun making these.


I had fun making these.

This monkey blanket is for a friend who is having a girl. The theme is: monkeys and pink. I may make her another on of these with pink on the back instead of pink dots. You can always use more blankets, right?

This blanket does not have an intended recipient. I plan on putting it on my new etsy shop. This is the first item to go in this shop.

This is the third blanket. I made it in a hurry. I wanted to show you what it looks like when you pull the blanket through the opening so, I took this picture for that. Then I finished the blanket, and since I was already thirty minutes late for the baby shower I bagged it; forgetting to take a picture.
I am happy to report that she LOVED it.
While I am showing you pictures that may help you make your own, here is a picture of how I close the opening. I use a slip stitch with a needle and thread by hand. I go in one side a stitch then the next side and pull closed. Then tie it off and pull the thread into the fold and clip. You really do not see the stitches when you are finished and looks good.
Subscribe to:
Posts (Atom)