So, I what I thought was Ms. Computer having an attitude turned out to be old age. She is about six-years-old. She was in need of a new fan and a new modem for starters. I was told that it would cost about as much to fix her as to replace her.
I am not giving up on her though. I am going to take her to a family member who, hopefully, can help her a little.
As for now, I have already made arrangements to replace her.
So, if we can get her to work a little longer then she will be appreciated, so that we will not have to divide time with her anymore (between my husband and me).
It seems that electronics just do not last!
Saturday, June 30, 2012
Thursday, June 28, 2012
Monday, June 25, 2012
Computer Issues
So, my computer is putting up a fight. It freezes up, mostly.
It seems it only wants to work when it wants to work.Which SUCKS!
I will keep you up-to-date as best I can about my crazy creations.
Hopefully miss computer will be on the mend soon.
It seems it only wants to work when it wants to work.Which SUCKS!
I will keep you up-to-date as best I can about my crazy creations.
Hopefully miss computer will be on the mend soon.
Saturday, June 16, 2012
New T-shirt flimsy
My latest T-shirt quilt top is finished.

I used as much of the shirts as I could by using the T-shirt backs and what was left from the T-shirt front to make the border.
 |
| Bonus-you get a peek of my garden. |
I really really wanted to have this quilt FINISHED by Father's Day, but, alas, it was not to be. I did, however, finish the top and will start quilting it by Father's Day.
 |
| You know you love my retro kitchen floor |
I really like the borders. What do you think?
Thursday, June 14, 2012
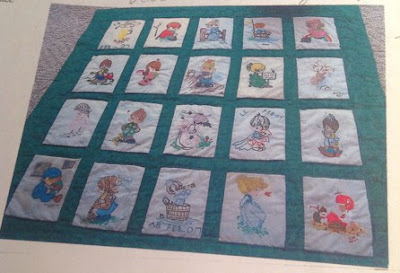
Replacing a Lost Quilt: Mission Accomplished
Mission accomplished!
 |
| in the shade |
I put all of the blocks together and took this picture before putting the borders on.
Don't you love the speaker and part of my computer in the picture?
 |
| almost a finished top |
After I had the blocks sewn together long way (top to bottom) with the sashes between the top and/or bottom of each block, I measure how long it was so that I could get a measurement for the remaining sashes. I was hoping that it would not measure over 44" so that I could just cut from selvage to selvage.
Unfortunately it was bigger. I do not like to sew sashes together if I can help it. I just prefer the look of one long slender cut. So more thinking cap...
Fortunately I was given approximately six yards of the green fabric for this project. If I was careful I would have enough to cut the sashes, borders, and binding and still have enough for the backing.
I did the math and thankfully it was close enough (math is not my strong point).
With the sashes being two and half inches finished I started cutting. Instead of adding half and inch for seams (so three inches), I cut it two and a half inches! So, I just put it aside for the binding. I still had more than enough for the borders, the sashes, and the binding left, but still. Talk about being nervous!
I finished the top and started quilting.
I marked lines in between the blocks and started quilting.
It has minimal quilting. I wanted to quilt it more, but I could not really quilt in the blocks and it was not easy to see on the fabric.
This quilt turned out to be a LOT bigger than I expected. Measuring: 53x55"
Doesn't it look so different in the setting sunlight?
I finished the top and started quilting.
I marked lines in between the blocks and started quilting.
 |
| setting sunlight |
This quilt turned out to be a LOT bigger than I expected. Measuring: 53x55"
Doesn't it look so different in the setting sunlight?
 |
| backing |
I am happy to report that the recipient loved it.
Can you tell which three has muslin behind them?
Can you tell which three has muslin behind them?
Wednesday, June 13, 2012
Replacing a Lost Quilt Details
This quilt was very straight forward.
The blocks were already made and all I had to do was put them together using sashing. To prepare, I was cutting the blocks into a more uniform rectangle. This was working until I found that there were three blocks that did not want to lie flat.


I basted as close to the edge and keep the sewing as straight as I could and stitched the folds in so that they would remain permanent.

Then I cut the block to size.
It worked perfectly! So, I repeated with the other two worrisome blocks.
Continued success!

I cut the rest to size and began to sew on the sashing. After sewing a couple this happened.

I sewed the sashing on backwards! I am just glad that it only happened once and in a small piece. I dislike working with the seam ripper, but who does?
The blocks were already made and all I had to do was put them together using sashing. To prepare, I was cutting the blocks into a more uniform rectangle. This was working until I found that there were three blocks that did not want to lie flat.

No matter what I did to cut or iron it, it would not lie straight. I did not know what I would do. I was worried that if I left it the way it cut that it would not sew straight, the sashing that would not lie straight, and the quilt would have this big wave. So, I put on my thinking cap. Thinking.......
What if I basted the block to something to stabilize it? That could work. Then I can cut that down to size and sew the basting stitches inside the seam. Why not? We use muslin for all sorts of stabilization of blocks.
Perfect! I decided right away to use muslin and later (after already using muslin) thought about paper.

I basted as close to the edge and keep the sewing as straight as I could and stitched the folds in so that they would remain permanent.

It worked perfectly! So, I repeated with the other two worrisome blocks.
Continued success!

I cut the rest to size and began to sew on the sashing. After sewing a couple this happened.

I sewed the sashing on backwards! I am just glad that it only happened once and in a small piece. I dislike working with the seam ripper, but who does?
Thursday, June 7, 2012
Replacing a Lost Quilt
I am putting together a quilt top for a friend of a friend. This was the original.
The tradition of this family is that when one of the women of the family has her first child all of the other women make a quilt block to be put into a quilt for that child. These quilts are family treasures.
Unfortunately this quilt was lost in a house fire. Many family members got together to replace the original blocks, and I was asked to do the honor of putting these blocks into quilt top and quilting it. Which is what I have been working on the past two weeks.
More to come...
Wednesday, June 6, 2012
maxi skirt
 axi skirts have been fashionable recently. I knew that I wanted one but I did not want to purchase one when I could make it instead.
 So, I started looking for tutorials and used a couple. These are a few that I found:
This maxi skirt tutorial is fabulous (and is the one I used for the red skirt). Another maxi skirt tutorial that is straight forward. Yet another maxi skirt tutorial that uses regular fabric instead of jersey fabric. There is even a tutorial to turn a dress into a maxi skirt. This looks so cool. I am on the look out for a dress that will work. My favorite (other than the fabulous three tired skirt) is this maxi yoga skirt (this is the tutorial I used to make the grey and blue polka dot skirts).

Here are a couple of things that I learned making these skirts:
Definitely use a ball point needle on jersey fabric. I skipped this at first and my stitches were skipping also.
Do NOT cut the bottom of your fabric and hem it before washing. You will REGRET it. I do!
Jersey does not ravel, so when you have it all finished (except the length) throw it in the washer and dry it. If you are still worried serge or zigzag the edge before washing it. Then cut or sew it to length. With the red skirt I just turned up the edge about a quarter of an inch and sewed the hem. I got lucky with that one. The grey one is the one that I have regrets with. I think I may shorten it a few inches and then hem it again.

Now I just need to finish the other two. Hopefully I can find a tutorial that adds pockets.
Subscribe to:
Posts (Atom)