On this last day of March, I am here to tell you that in March I have worked hard on my quilty goals. I finished a quilt for a friend by putting on the facing. I also completed two quilt tops: the Auburn quilt (blue, orange, and tiger) and the houndstooth quilt top (I will be posting about it in the next couple of days).
I have also started quilting the Batik Slash and the houndstooth quilts.
I would go into a little more details, but I am exhausted tonight.
I am off to dream of quilts and free motion quilting on these two quilts.
Tuesday, March 31, 2015
Monday, March 23, 2015
Strip: Orange, Blue, and Tigers
Back in late August early September, I bought these
fabrics to make a quilt for a friend. I never got started, so I put this on my quilt goal list.
This past week I found a little time to cut the strips and later a little more time to start piecing.
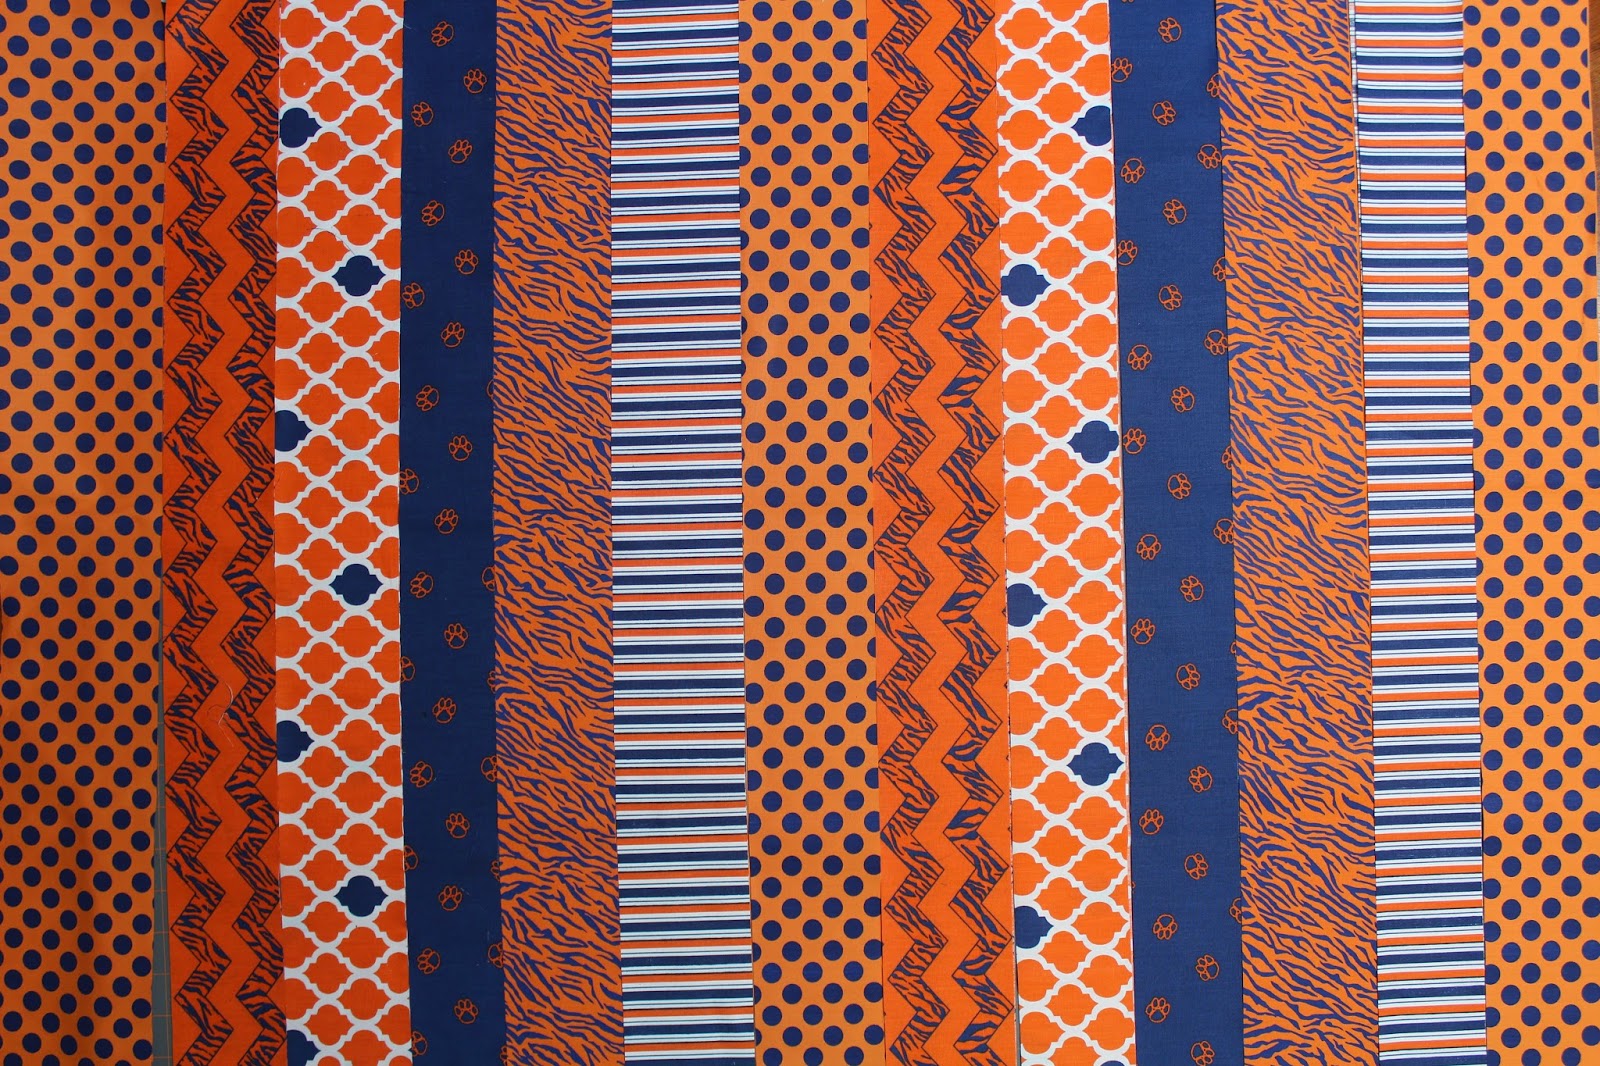
I had this half way pieced and left it on the table. With my prior engagements cancelled, I was able to finish it up.
.jpg)
I knew I had to take a picture of it now or I would not have a flimsy to show.
I do not think there is enough blue fabric in this quilt but plan to use it for the binding which will work great.
Friday, March 20, 2015
Finishing the Unifinished 4: part 2
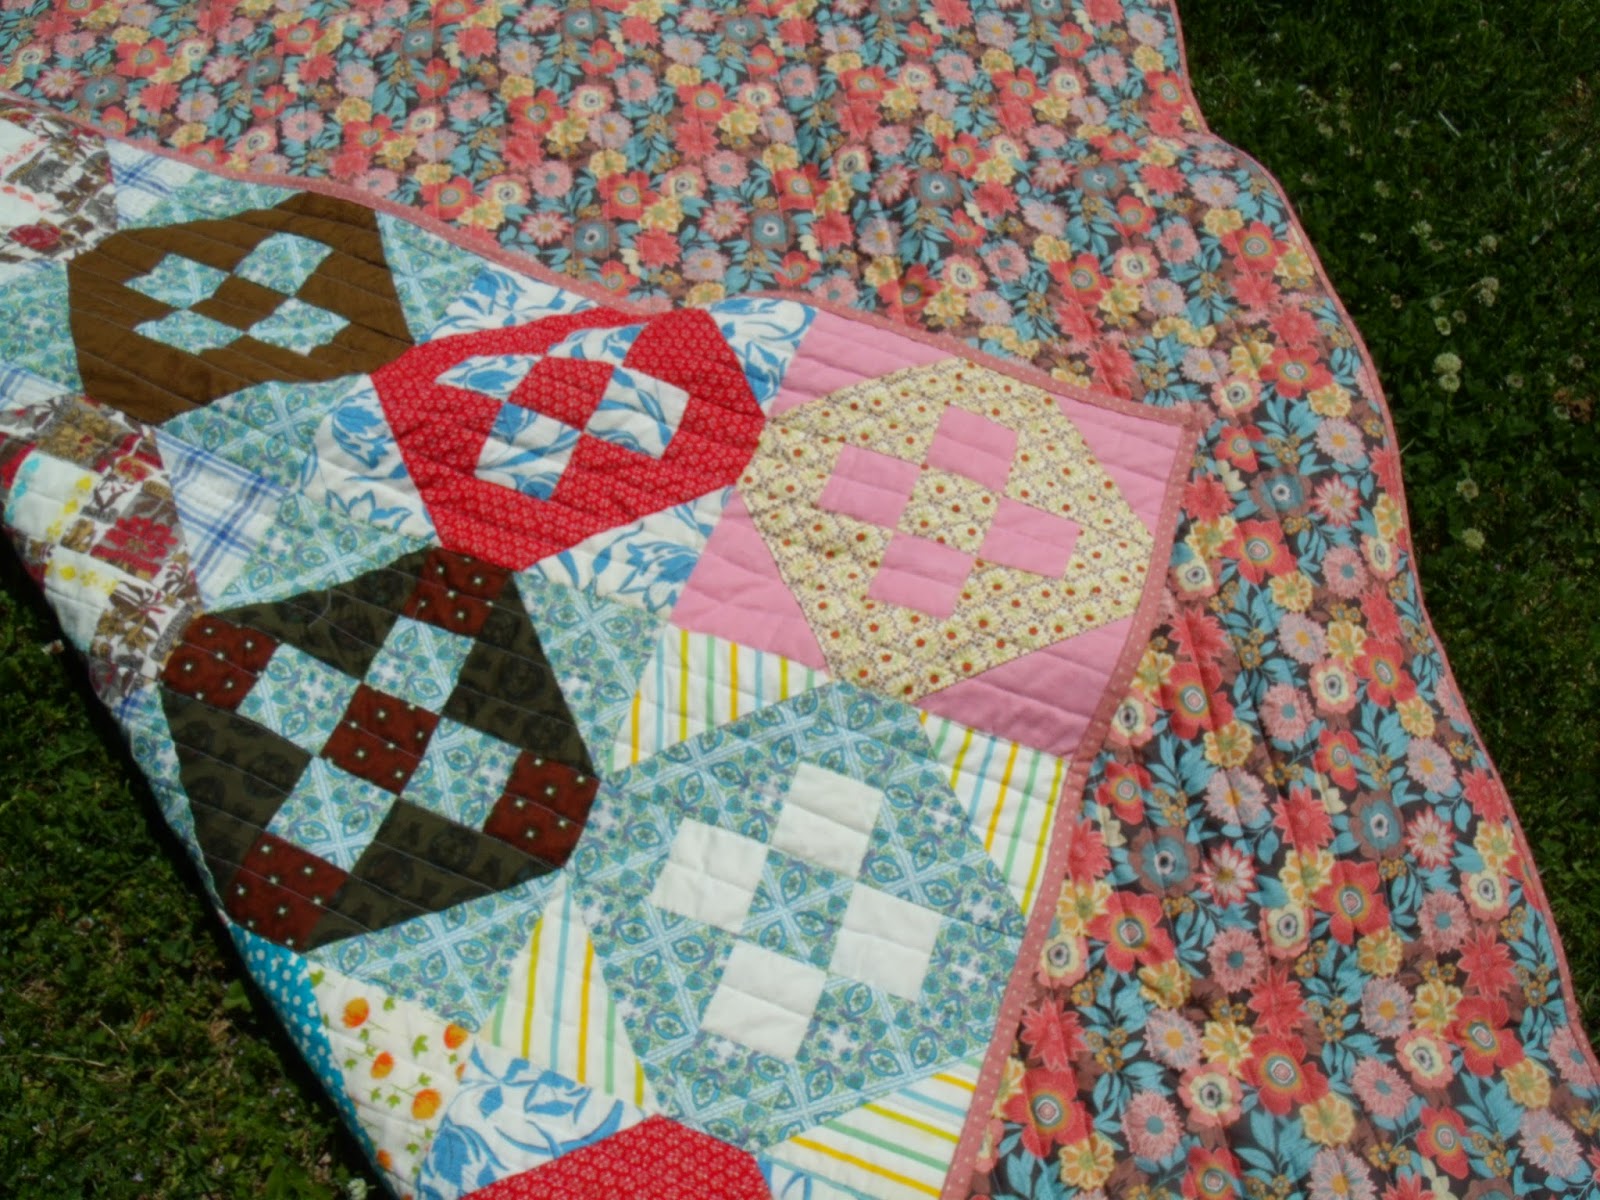
Before I began quilting this quilt top, I looked how to finish a hexie quilt. I was not looking forward to binding this quilt and I was looking for tips on how to put a binding on an edging like a hexie quilt. Instead of finding how to put a binding on a hexie quilt, I found how to put a facing on one.
I found this blog describing how she had finished a grandmother's flower garden for a friend. She used this video as a guide to help her finish her quilt. It helped me also (a LOT). The only thing that I would change is that I would make my facing strips wider if the edge is deep. I'll try to explain what I mean a little later.

When you put the facing on, there is a LOT of pivoting, but it is VERY worth it! Basically sew a basting stich on the front.
I did not follow instructions by sewing this as a scant 1/4". I think that it would have been better to sew under the quarter inch, but I did not realize until I had finished and was not going to take it all out. Instead I left it and it worked fine. I suggest sewing less than I did, but don't stress if you do as I did. It still worked great.
This is a lot of sew, pivot, sew, pivot, sew, pivot...

...sew, pivot.
I did not take a picture of the next step of sewing and pivoting on the back of the quilt. Why must I forget to take pictures that would help!
So...you cut most of the backing and binding away; pin the facing to the front; and sew it on just a little under the basting (this is where the quarter inch is used). This means there is more of the same sewing and pivoting on the back. Don't worry, it won't take long, you are almost finished, and it is WORTH IT!
When you finish with all the sew/pivots, you cut away the batting and facing fabric, clip the corners, and flip it over (just like binding) and whip-stitch it to the back (again, like binding). DONE!

Okay, this is what I mean about the deeper sections. The picture above is showing (what I am calling) deeper than the picture below. The video only shows how to work with the hills of the bottom picture. It did not show the plateaus that I worked with in this top picture.
Both sections of facing in these two pictures are the same width. The difference is the depth of the valleys. The facing on the back of the hills were just as I hoped but with the plateaus there was barely enough to cover the seam. Again, I would cut the facing a few inches wider.

Once you have the facing whip-stitched to the backing you see the awesomeness of the facing, especially on a hexie quilt! It really shows off the edges of this quilt without doing something drastic to make a binding work (such as cutting them off!).

The edges look so clean and impressive! All of that pivoting pays off big!

And now the reveal of the finished quilt!
This low-contrast hexie quilt is just so sweet! I think the subtle quilting is was the best way to quilt it. And the facing! What a difference the facing makes! I think I will put a facing on more quilts even those without irregular edges.

With the front being low contrast, I decided to go a little bolder with the backing. This print and its colors seemed like the best fabric to match the front. I finished the bolt which was long enough for the back, but not wide enough, so I decided to tone the boldness down with solids. I had the white and yellow fabric left from the last t-shirt quilt I made and thought they worked great. I did briefly consider using a plum for the facing, but I had the yellow AND thought it would really look better. I am so glad that I did not change my mind and pick up some plum.

I am just in love with this finish!
I delivered it to my friend who, along with her daughter, is also in love with it. Her daughter loved it so much that it has become her quilt. Now a fourth generation is falling in love with quilts. When I was leaving this little girl informed me that she wants to be a "sew maker" when she grows up. Best way to melt a quilter heart!
Wednesday, March 18, 2015
Finishing the Unifinished 4: part 1
Last week I showed you the quilt that I finished for her last May. This week I am staying on my quilty goals by finishing the second to the last quilt top that I am finishing for my friend.
This hexie quilt is so very sweet. I really love it! I am very glad that I was able to finish this quilt for her. It feels like an honor to finish this quilt.
Does anyone know if this is considered a grandmother's flower garden? I am not sure with the background being two different colors.

This quilt is hand pieced. My friend tells me that two or three members of her family worked on this quilt: her grandmother and two aunts worked together to make this quilt.

This is my favorite block. I did not notice until I was quilting that this block has one different fabric. The color and pattern of the mismatched block match very well. It is hard to notice unless it is pointed out.

I thought about a few ways to quilt this wonderful quilt. I looked at ways others had quilted hexie quilts and decided that I would just quilt with straight lines from top to bottom. I think it looks perfect on this quilt.

Thursday, March 12, 2015
Finishing the Unfinished 3
I cannot believe that I never showed this quilt!


It is a Roman Coin quilt, and I think it is lovely! It is hand pieced and is one of the five quilts my friend asked me to quilt for her.
I finished it May 2014, and she gave it to a family member as a baby quilt for a sweet little girl.
I looked for a while at Joann's for backing fabric that would match quilt and found this fabric, which I think works perfectly with this quilt.
I love that with this quilt there is some mirroring. The center row is completely mirrored and several others are mirrored with some of the coin fabrics but not the background fabric, but not all of the blocks match.
The four corners are mirrored and all the same.
With this quilt going to a little girl, I thought that using more pink would be perfect. I pulled this fabric out of my stash. Sweet little hearts.
I quilted this in a straight line. Soon my friend will wonder if I can quilt in any other way. Ha! It is easy and goes well with a quilt top that has been made for sometime and needs finishing. Also I think that it does not take the spotlight off of the quilt top.
So, there you go. A wonderful quilt finished. It is lovely and I have been told that the precious little girl loves it.
Friday, March 6, 2015
Batik Slash Sash Flimsy
I started this quilt summer of 2011.
When I started this quilt I had someone in mind and I planned to make this a lap sized quilt.
I, of course, thought I would have it finished by now, but other projects continued to get more attention. I worked on this some last spring and again put it to the side. Since I am working diligently on my 2015 quilty goals this one has come to the top.

It is NOT a lap quilt, but it is okay to change plans.
It IS a wonderful baby quilt. Even though many of the points do not meet and some are cut off, this is a beautiful quilt. Technique does not always take center stage, nor does it always have to.
This quilt was pieced on two different machines. I am not certain if that is what made the blocks different sizes, but I've heard that it can. Especially if you do not know where your true quarter inch is located on the machine you are using.

For the most part, the size difference in the blocks do not affect the quilt. I trimmed all of the blocks to three different sizes as close to its previous size and in groups of four. Then I joined these groups into rows. I put a border on each section to make up for the smaller blocks. I am going to trim these borders after quilting to square up the sides.

I have a backing for this quilt and will start quilting it soon.
.jpg)
A little something extra: a picture of me spreading this quilt on the fresh snow for a snow picture. Enjoy the purple sweat pants.
Monday, March 2, 2015
T-shirt Memory Quilt HJ
*long post


The bandana was very easy. I treated it like a t-shirt and it worked great. It got an extra amount of quilting, which I loved.

 We has fun trying to take pictures of this awesome quilt in the snow and wind. It did not work all that well, but we had fun.

I was asked by a friend to make a quilt out the t-shirts, jerseys, sweatshirt, and bandana that were her sons. She lost her son several years ago and had saved these shirts hoping to have them turned into a quilt one day.
I, of course, was more than happy to make the quilt for her.
Like most t-shirt quilt there were a few challenges. She told me what she wanted from the shirts and I tried to make as much of that happen as I could. I thought I might share some of the challenges I worked through in this quilt so that it might help some of you.
This shirt was a little baseball shirt from when he was a child. It had his number on the shoulder and she asked to preserve the number and to use the shirt front.
Normally when I work on a t-shirt quilt I cut off the neckline. This time with the number being so close to the neckline, shoulder, and sleeve I did not think I would have enough seam allowance if I cut around it.
What I decided to do was cut the shoulder seams off straight, cut the bottom of the shirt off, and glue the shoulders and neckline to the bottom of the shirt.
Another challenge was using net jersey. I had never used a net jersey before. I did not want to directly put fusible interfacing on the jersey because it would fuse to the ironing board and might breakdown eventually and the batting come through.
I searched for answers on how to use this and found nothing! Wow!
I decided to glue the jersey around the edges, where it would probably be cut off, to a piece of plain fabric that matched in color. Then I ironed on the fusible to the plain fabric and put in some basting stiches. It worked great! The only thing I would have done differently is to put in more basting stiches. Net jerseys are very slippery and with the basting it made it easier to quilt.
There was this sweatshirt which had a front pocket. I thought it would be nice to save this pocket so that she could also put her hands in the pocket. On the bottom, the pocket was sewn into the waistband. I simply cut this off and left it alone on the bottom until it was sewed into the quilt which closed the bottom.
My favorite part is the little shirt he wore as a small child. She asked me to put this shirt in and I am sure that she did not think that I would put the entire shirt on the top uncut, but I thought it best to have this little shirt to show how little he was.
I talked with a friend who did something similar with her daughter's shirt about how she put the shirt on her quilt. She said that she cut the back off, glued it to another piece of fabric, and put a finish on the edge of the cut shirt.
I did something similar. I did not want to cut the back off, because I wanted to save the tag, and I did not want to somehow finish the raw edge where I hat cut the back off. Instead, I glued the back to a plain back of a different shirt and baste stitched it down. When I quilt this block, I quilted through all of the layers and broke a couple of needles. Perhaps if I do this again I will opt to cut the back off, but it worked very well this way.
The bandana was very easy. I treated it like a t-shirt and it worked great. It got an extra amount of quilting, which I loved.
Also, in the baseball jersey (in the bottom corner), I glued a sleeve from a different shirt in the v neckline to keep the buttons, and to avoid sewing a bulky seam. I quilted his initials there in the neck.
When I gave this quilt to my friend, she was overjoyed to have it. I was overjoyed that it brought her so much happiness.
Once again I used this black and white circle print fabric for the backing and binding. It is perfect for a quilt that is multicolored like a t-shirt quilt!
I enjoyed making this quilt for my friend and I know that she is greatly enjoying it.
Subscribe to:
Posts (Atom)